For me, and I suspect many people, the first time you will encounter a compression fitting is when it starts leaking. Based on Murphy's Law it will be located in the most inaccessible place in your house: behind plasterboard, at the back of a sealed kitchen unit or under the floorboards. You will notice a wet patch or a flood in the kitchen or some other catastrophe.
For me, it was in the kitchen sink unit.
I think it started with a leaky kitchen tap. During the investigation I discovered the pipe was dripping where it connected with the tap.
So what is the first thing you do ? Why, tighten the nut of course! Bad idea, that just made it worse.
At this point I cut of the water supply - assuming you know how to - which fortunately I did. It is called the rising main. It is the first tap inside the house where your water supply comes in.
Friday, May 9, 2008
Ben's plumbing odyssey: 3. My favourite plumbing tool

The most useful tool I have in my plumbing toolbox is a pipe cutter. This tool was a revelation when I first discovered it. If you really think about it, the ability the cut pipes into sections is what makes plumbing possible. Once you figure out how to cut a pipe in two all you then have
to discover is how to connect sections of pipe together - in a variety of ways. Think of those big chemical plants or oil refineries with their miles of pipework arranged haphazardly. It wouldn't be possible without a pipe cutter would it ?
I remember purchasing the tool from a local DIY store (I think it was this one) and thinking that £10 was expensive. In retrospect, it was one of the best investments I have ever made. I must have saved a fortune in plumbing bills as a result. I also bought 2 compression joint straight connectors.
I think the first time I used the cutter was when I wanted to move the water supply pipes to a washing machine. This required me to graft an extra section of pipe onto some existing pipework. Armed with the knowledge of compression joints (see Chapter 2) I thought I would give it a try.
I bought a 2 metre length of copper pipe and began cutting a section of it using the tool. The tool basically works by progressively tighting a screw which adjusts the pressure of the cutting wheel on the surface of the pipe. You basically draw the tool around the external surface of the
pipe and gradually turn the screw (which increases the pressure on the pipe). As the disk cuts into the pipe the pressure reduces so you have to progressively turn the screw as it cuts through the pipe. Eventually the disc completely penetrates the pipe. You then draw the tool around the remainder of the pipe and the section of pipe breaks away. Easy peasy eh!
Unfortunately, this was not the case first time around. I think I tightened the screw too quickly and bent the pipe. Still, two metres of pipe allows for alot of mistakes. After a couple of attempts I had mastered the technique.
Next ... how I connected them.
Ben's plumbing odyssey : 2. An audience with Mr Fixit
I was at a friends house - who was serious wizard in the art of home maintenance. He was bleeding the radiators and I noticed a few missing floorboards which had not yet been replaced.
Me : "Why are the floorboard missing"
Mr Fixit: "Because I moved the radiator"
Me : "Did you get a plumber to do the pipework then ?"
Mr Fixit: "No, I did it myself."
Me : "Do you know how to solder pipes together then ?" (This was the only method I knew of.)
Mr Fixit: "No, I used compression joints"
Me : "What's a compression joint ?"
He explained what a compression fitting was. I was fascinated. I had all sorts of niggling plumbing problems at home with various pipes in the wrong places and redundant bits of pipe. Perhaps if I could get to grips with this I could address a few of them - and save myself a pretty penny in plumbing bills. Ah... the prospect of plumbing independence. Emancipation from the tyranny of plumbing bills.
Anything was possible now. Perhaps I could irrigate the sahara next!
Ben's plumbing odyssey : 1. The leaky pipe
My plumbing oddysey began with a leaky pipe. Drip, Drip, Drip, it had been that way for a few days. A 20cm length of pipe protruding from the eaves of my house was dripping constantly. There was a permanently wet patch on the front step. "Perhaps I should take a look" I thought.
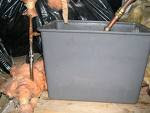 So I climbed into the loft and found the water tank. It was an old, cubical shaped, plastic tank. It used the standard ballcock device to switch the water off. The ball drops, the valve opens and water fills the tank. The ball is raised and the flow stops. Unfortunately, in this case it did not stop. It just continued to drip, drip, drip.
So, next step, to locate the main water supply to the house. For all
you newbies reading this, this is known as the rising main - I didn't know then either. This was located in the broom cupboard next to the front door.
I turned off the supply tap. "Good" I thought, "At least there wont be a flood now".
Back in the loft I started trying to dismantle the ballcock assembly. The valve was made completely of brass and covered in a residue of limescale - horrible stuff, it gets under your fingernails, it's abrasive, yuck. After dismantling the valve I discovered that leak seemed to emanate from a white plastic tube which resembled a short section of wax candle.
I contacted my father and asked him for some advice. He knew exactly what to do. Essentially the 'candle' thingy unscrewed and inside was a rubber disc. The rubber had perished which had meant that it did not form a proper seal to cut off the water flow when the ballcock was raised.
My father had brought a replacement washer with him suspecting this was the problem all along. We reassembled the valve and BINGO, no more drips.
It seems silly now that it caused so much trouble and that I could have been so ignorant of something so simple.
But at the time it felt great to solve the problem. No more drips and no unexpected bill from the local plumber.
From the sands of Arabia to the bottom of my toilet.
My wife used to have no end of trouble trying to get the bottom of the toilet clean. There seem to be 101 cleaners out there on the market and - not to put to fine a point on it - they are all rubbish.
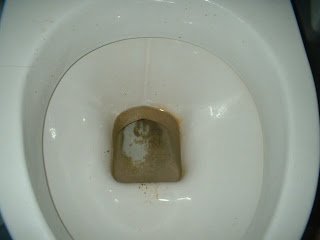 The U bend of the toilet gradually seems to accumulate a - caked on - green/brown course residue. Over time it becomes darker and darker. Trying to scrub this off is basically impossible.
I mentioned this to my next-door neighbour who is a cleaner. She instantly replied "Oh, you need Spirit of Salts". I had never heard of it. Well I had heard of it, just not by that name. It's more usual - chemical - name is Hydrochloric Acid.
"What's that got to do with Arabia ?" I hear you ask. The answer lies it a little research I did and is courtesy of Wikipedia.
 Essentially, the bloke who invented this stuff was an Arab - from the 8th century - by the name of Jabir ibn Hayyan (Geber) and he was medieval alchemist. He was also a polymath which - after all - is the theme of this blog. I like polymaths/generalists/Jack of all trades - or Jacques in my case.
From wikipedia:
In the Middle Ages, hydrochloric acid was known to European alchemists as spirits of salt or acidum salis. It is still known as "Spirits of Salt" when sold for domestic cleaning purposes in the United Kingdom today.
So, there you go. Thanks to this bloke I can now clean my toilet - but I'd best be careful. This stuff is seriously corrosive. Here's how to go about it. The liquid is sold in plastic bottles - of usually 1 litre capacity. The lid is one of those 'kid proof' lids that you have to push and twist to open.
Go in the bathroom and open the window as wide as you can. Now hold your breath and open the container. Pour about 1/2 the contents into the toilet. If the toilet is really dirty then pour the whole lot in. Make sure you close the lid if there is any left.
Now get the hell out of the bathroom and close the door - you can breath now. Why do you have to hold your breath you may ask. Here's why:
Hydrochloric acid in high concentrations forms acidic mists. Both the mist and the solution have a corrosive effect on human tissue, with the potential to damage respiratory organs, eyes, skin, and intestines.
Basically, this is nasty stuff and you don't want to take any chances.
When you return after 30 minutes the toilet bowl will absolutely spotless. All evidence of grime will be gone, and it is all thanks to Mr Geber. He may not have discovered how to turn lead into gold but I am sure housewives up and down the land will be eternally grateful.

Wednesday, May 7, 2008
Where there's smoke there's fire (maybe)
Then again he came back! I was fixing some pipes
when that old nuisance Lorax came back with more gripes."
The Lorax, Dr Seuss
 I was sitting at home one Saturday morning when my wife came back from the supermarket in the car.
"Ben, there's lots of smoke coming out of the engine" she said.
"Shit! the car must be on Fire". I rushed outside. White smoke was billowing from under the front bonnet. First things first, make sure the car is empty, baby seats, everything. My heart was pounding.
I stood there looking at the car. "What do I do now?" I thought, "phone the fire brigade ?".
After a few minutes the smoke did not seem to be getting any worse so I thought I would risk it and open the bonnet just a little.
On opening the bonnet I saw lots more white smoke but no sign of flames. This was reassuring. A few moments earlier I had thought my car was toast, literally and metaphorically.
 The smoke gradually cleared and revealed a small hole in a pipe 15mm in diameter running from the radiator to the engine. It was connected to two rubber hoses and bolted to body of the car. Have you ever seen one of those old films from the 40s and 50s where the car breaks down and the driver races to open the radiator cap and he's burning his hand and there's steam everywhere. Well, that's basically what had happened only through the hole in the pipe.
I had paid out a fair amount of money in repair bills in the previous few months and was feeling pretty impoverished. The last thing I needed was another big bill.
Try to bear in mind that I had never really had any interest in fixing cars. Computers were my thing. However, looking at this pipe I thought "I wonder if I can get a replacement pipe and fit it myself, it does not look too difficult. I can always take it to the garage if I fail".
 There was a Renault dealer about one mile from where I lived. I undid the jubilee clips and the bolt securing the pipe to the body of the car and took it with me to the dealer.
It's a bit intimidating the first time you enter a spare parts department. I was expecting all kinds of hostility and questioning about whether I was a trade buyer. However, everything was a breeze. "Have you got one of these ?" I said, and showed him the broken pipe. He looked it up on his computer system. "I'll be back in a second" he said, and went off to the warehouse. Two minutes later he reappeared with an identical new pipe in a sealed plastic bad. That will be £15 he said. I remember leaving the dealer feeling euphoric. "Wow, that was easy, I thought".
When I got home I fitted the pipe very carefully. One of the clips securing the pipe to the rubber hoses had broken so I replaced it with a new jubilee clip. "That wasn't very hard" I thought. Now for the moment of truth. I started the engine.
The car purred into life, all the usual sounds but no sign whatsoever of smoke. I felt exhilarated. I must have saved at least £200 I though.
Its funny. Looking back and knowing what I know now I would have probably just taped up the pipe. It still felt great at the time though.
The leaky radiator valve
 I will always remember the day when I discovered a leaky radiator in the girls bedroom. The valve was dripping and I knew nothing about radiators. A few weeks earlier I had handed over seventy quid for 10 minutes work.
There I was, bricking myself. It was 10pm on a Sunday night and I had to get up for work early the next morning. Was the leak going to get worse, stain the carpet, leak through the floor and cause more damage. It seems crazy to me now that I was even worried, but I was.
So I removed the radiator cap and had a good look. The valve was pretty rusty but seemed in reasonable condition. Water was weeping from what looked like a screwed on nut but not very much. I took a calculated risk that if I used a spanner and very gently tightened the nut it may stop the leak.
Anyway, I tried it. I must have given it about and eighth of a turn. The dripping stopped. Eureka! I must have stood looking at that valve for about 10 minutes admiring my handywork. I had been worried about the prospect of hiring a plumber to fix it. Undoubtedly, he would have stopped the leak but how much would he have charged. I did not know anything about radiators and he could have claimed any of the following:
- tightened the valve (basically what I had done). 2 minutes work.
- drained the system, replaced the valve, refill the system. Loadsa money.
- replaced the radiator.
For the two remaining years I lived in that house the radiator gave no more problems. I had taken my first steps on the road the plumbing nirvana.
Subscribe to:
Posts (Atom)
